How to Configure Domain Redirects in cPanel?
How to Configure Domain Redirects in cPanel?
While running and maintaining a website, there are instances when it becomes necessary to redirect traffic from one domain or page to another. Whether you’ve undergone a rebranding process or are simply restructuring your website, cPanel offers a convenient solution for domain redirects.
In this article, we’ll explore the step-by-step process of configuring domain redirects in cPanel, empowering you to manage your website’s redirection needs seamlessly.
Also Read: How to Add a New Domain To Cpanel?
Steps to Configure Domain Redirects in cPanel
1. Log into cPanel
a. Begin by logging into your cPanel account, the central hub for managing your website’s hosting environment.
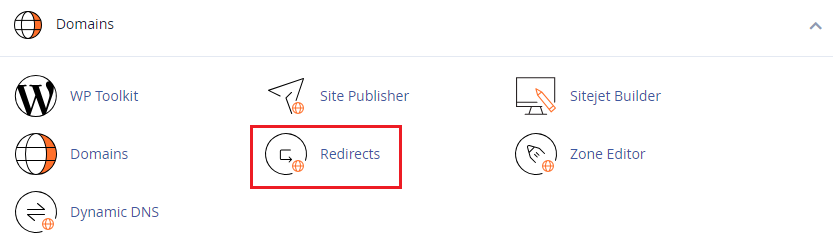
2. Navigate to Redirects
a. In the ‘Domains’ section, locate and click on the ‘Redirects’ option.
3. Choose Redirect Type
a. Select the type of redirect that aligns with your goals:
➔ Permanent (301): Ideal for updating bookmarks and informing search engines about the new site.
➔ Temporary (302): Redirects visitors without updating bookmarks, preserving the search engine’s original indexing.

*Note: Permanent (301) redirects are generally recommended for long-term changes.
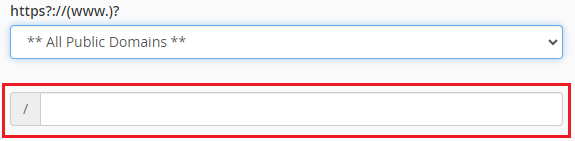
4. Select the Domain and Specify Destination
a. From the dropdown menu, choose the domain you want to redirect.

b. If redirecting a specific page or directory, enter the relevant information in the provided text field.
5. Specify Destination URL
a. Enter the complete URL of the destination page to which your domain will redirect by including the protocol (http:// or https://).

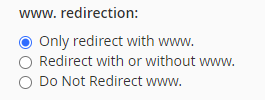
6. Configure www. Redirect
a. Choose the appropriate option based on your preferences:
I. Only redirect with www.
II. Redirect with or without www.
III. Do Not Redirect www.
7. Wild Card Redirect (Optional):
a. If needed, check the ‘Wild Card Redirect’ option to redirect all files in the current directory to their counterparts in the new directory.
Example: With Wild Card Redirect, example.com/test/ redirects to example-test.com/test/.
8. Create the Redirect:
a. Click the ‘Add’ button to implement the configured redirect.

Also Read: How to Create a Subdomain For Your Website
Conclusion
Configuring domain redirects in cPanel is a straightforward process that allows you to manage changes to your website’s structure or branding efficiently. Whether making permanent adjustments or temporarily redirecting traffic, cPanel provides a user-friendly interface to meet your redirection needs.
By following the outlined steps, you can ensure a seamless transition for your website visitors while maintaining control over your website’s online presence.
Congratulations! You have successfully learned how to configure domain redirects in cPanel.
Related Posts:
- How to Enable or Disable PHP Error Logging in cPanel?
- How to Create a Table in phpMyAdmin?
- How to Create a basic SPF Record in cPanel?
- How to Reset Email Account Password in cPanel?
- How to Change MySQL Database User Password From cPanel?
- How To Decrease Inode Usage In cPanel?
- How to Change Table Name in phpMyAdmin?
- How to Set up Email Forwarding in cPanel?
- How to Configure Domain Redirects in cPanel?
- How to Change the Time Zone in cPanel Roundcube Webmail?

Latest Posts
- Server-Side Scripting: PHP, Node.js, Python – A Detailed Comparison
- Securing Your Website in 2024: Essential Strategies for Online Safety
- The Future of Web Development Technologies: Trends to Watch in 2024
- How Banks Handle Server-Side Operations and Ensure System Security: An Inside Look
- Tips for Writing Clean, Understandable, and Efficient Code: Avoiding Garbage Code
- Tailwind CSS: Revolutionizing Modern Web Design
- Basic Linux Commands for Beginners: A Starter Guide
- Dairy Farming Loan Apply
- BSNL Recharge Plan
- Bijli Bill Mafi Yojana Online Apply
Technical
- DevOps Roadmap
- How To Install and Configure an SNMP on Ubuntu 20.04
- Apple releases iOS 18 Developer Beta 2 with iPhone screen mirroring, RCS toggle,and more
- How to enable SNMP on Ubuntu Linux 18.04 and above
- How to Force HTTPS Using .htaccess (Updated 2024)
- Display All PHP Errors: Basic & Advanced Usage
- PHP alert
- MongoDB loads but breaks, returning status=14
- MongoDB database deleted automatically
- MongoDB all Error Solutions
Category